 So you want to build some furniture but have no idea what you’re doing? No worries! Let’s build the simplest project out there, but one that nearly everyone needs — bookshelves.
First, you need to start with good wood. It’s gotta be straight and flat. This is very important! Curved or twisted boards will cause you no end of headaches. Generally, if you want a light-colored wood, use maple, for a honey-colored coarse grained wood use red or white oak, for a wood that turns a deep reddish-brown use cherry, and for a dark brown wood use walnut.
You can find red oak at most big box stores, and some also have maple and walnut. The boards will be S4S (surfaced 4 sides) and come in varying widths all at 3/4” thick. The best place to get wood, though, is your local lumber yard. I find the wood there is more often than not flatter, straighter, more stable, more beautiful and cheaper than wood at a store.
Next you need some tools! Here’s your tool list:
- 12” combination square (soooooo worth it to spend the extra $ on a Starrett)
- Cross-cut hand saw (not too big, 10” or so)
- Electric drill (anything goes)
- Self-centering doweling jig
- Clamps (Bessey f-style clamps seem to have the best price/performance ratio)
- 5/8” plug cutter
- 5/8” forstner bit
- Tape measure
- Wood screws, #16, 1.5” long
- Wood glue
- Sandpaper
- Varnish (I like Waterlox)
Now, to build. Measure out the width of the shelves on one board, and use your Starrett to draw a line all the way around it. With your handsaw, start cutting at a 45˚ angle precisely to the outside of your pencil line. If you’re careful, it’s not too hard to cut exactly to the line. Next, cut your shelves — they should be 1.5” shorter than the top and bottom boards; and your sides — they should be 0.75” shorter than the total finished height.
Next, mark the tops of all your shelves and the top piece, and the outside face of your sides, and pick a side of your doweling jig and mark that as the top, too. Then measure and mark 2” in from the sides of all your shelves. With your doweling jig, drill two 3/16” pilot holes an inch deep into the ends of each shelf at those marks.
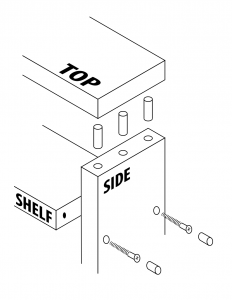
And now the sides. Measure and mark the holes for attaching the shelves at whatever height you want them. With your 5/8” forester bit, drill a hole 1/4” deep into the outside face of each side at all the locations you just marked. Then drill the 3/16” pilot hole all the way through.
Next drill three 5/8” holes 1/4” deep into the top of each side — 2” in from the side, and one in the dead center. Measure, mark and drill six (three on each side) corresponding holes 1/4” deep into the underside of the top.
Last, take the scraps of wood you have left over and cut some plugs. Six at a little under 1/2” deep, and one at just under 1/4” deep for each of the holes in the side.
Now screw it together. Then glue the 1/4” plugs into the screw holes and use the 1/2” plugs you just cut as dowels to join the top to the sides. Clamp them together to get them nice and tight. Wipe up any excess glue with a damp paper towel.
After the glue has dried, cut all the plugs flush with your hand saw, and give the whole thing a little sanding to smooth it out, and apply your finish. I’ve found that an oil-based varnish will be as easy-to-use and durable as polyurethane, but does a better job of bringing out the beauty of the wood.
More Posts by The Author:
Joining Rhode Island’s Mathematical Trailblazers
The Dangerous Pests You’ll Find Lurking In Rhode Island
Relent
Fall on the Streets: Walking around PVD artfully
Phillipe and Jorge Columnist Chip Young Passes Unexpectedly: Motif mourns the loss of an extraordinary journalist